Controlling Digital Mixers Remotely with Mixing Station
Guide to Using Mixing Station to Control Digital Mixing Consoles
Overview
Mixing Station is the most helpful tool you can get for any modern digital sound console. It lets you use your own phone or tablet to control the mixing board wirelessly over Wi-Fi. The biggest advantage is that it works with most common digital consoles, so you only have to learn one app interface to mix on almost any digital console.
Controlling the mix remotely allows you to check the mix from the audience's perspective as well for your artists on stage. Ultimately, Mixing Station makes complex consoles easier to use by letting you customize the screen to show only the controls you need.
Download Note: Mixing Station is available on Windows, macOS, Linux, and the major mobile platforms: the Apple App Store (iOS/iPadOS) and Google Play Store (Android).
Guide to Using Mixing Station to Control Digital Mixing Consoles
1. Connect to the Console's Network
3. Setting Up the Connection Profile
4. Adjusting Levels in the Mains
Adjusting the overall master level of the main speakers
Method One - Sends on Fader Style
Method Two - Adjusting Sends for a Particular Channel
6. Labeling Channels with the Scribble Strip
7. Modifying EQ, Effects, and Parameters
10. Accessing Console Functions (Routing)
Getting Started
1. Connect to the Console's Network
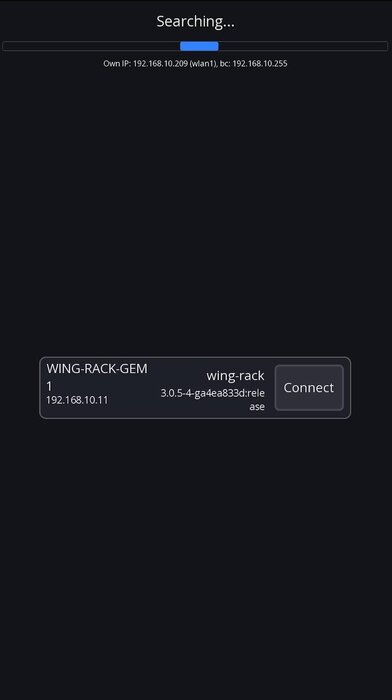
Before opening the app, your device (phone, tablet, or PC) must be connected to the same Wi-Fi router that your mixer is connected to. Mixing Station communicates with the console over this local network.
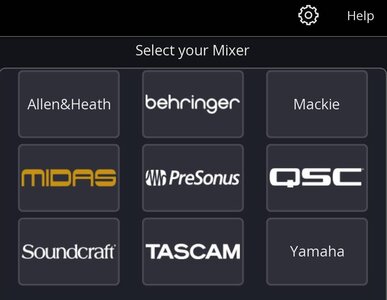
2. Opening the App
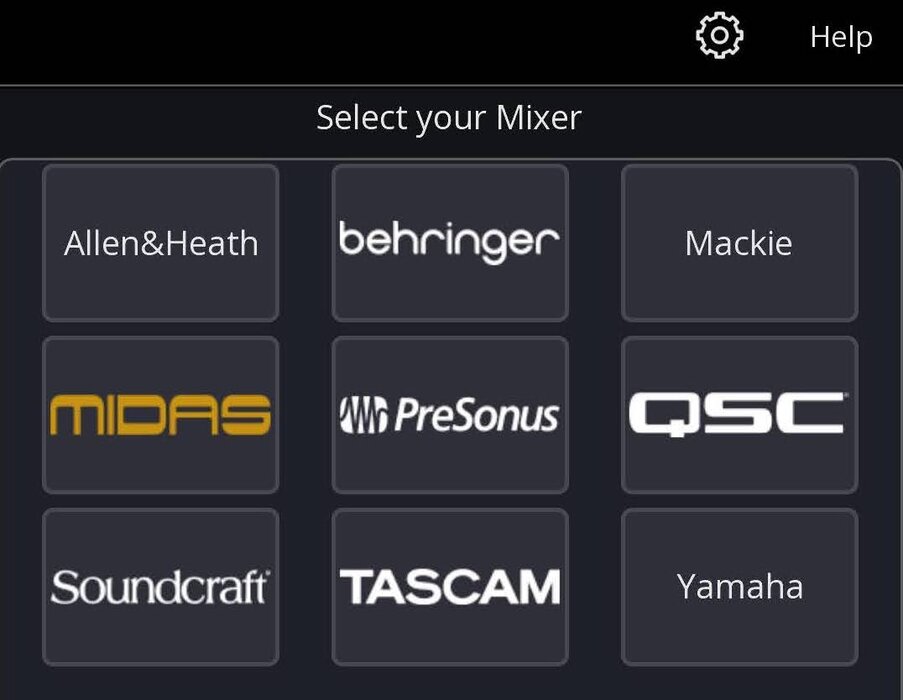
When you open Mixing Station, the first screen you see is the "Select Mixer" screen. This is the main connection hub.
-
If you are a first-time user, Select your mixer or find the add mixer (or ‘+’ icon) to create your first connection profile. This step tells the app the exact model and network address of your console.
-
The List Area: This is where mixers you have previously connected to will be listed as Connection Profiles.

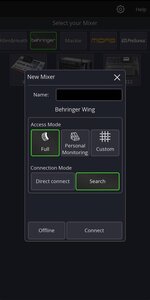
3. Setting Up the Connection Profile
Connection Profile Dialog
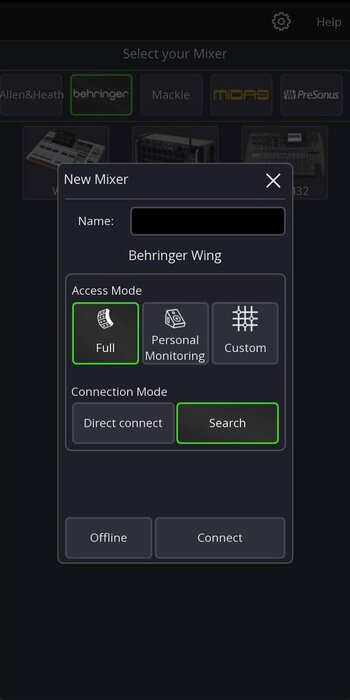
After selecting the mixer model (Behringer WING Rack in our case ), the Connection Profile Dialog appears. Here, you define the settings for this specific connection:
-
Name the Mixer: Provide a recognizable name for this connection (e.g., "WING Rack").
-
Access Mode: Select the level of control:
-
Full: Unrestricted access for a mixing engineer.
-
Personal Monitoring: Limited to controlling only one monitor mix bus (for musicians).
-
Tap the Connect button to link to the mixer, or Work Offline to edit layouts without a console connected.


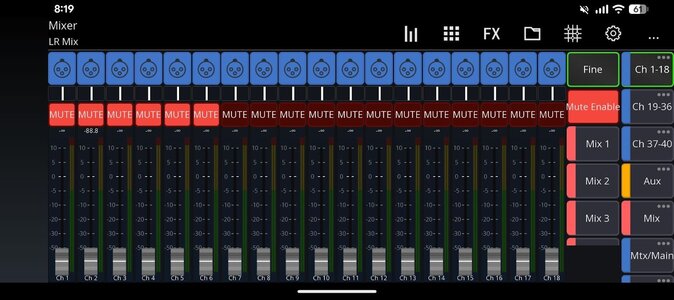
First View Upon Connection
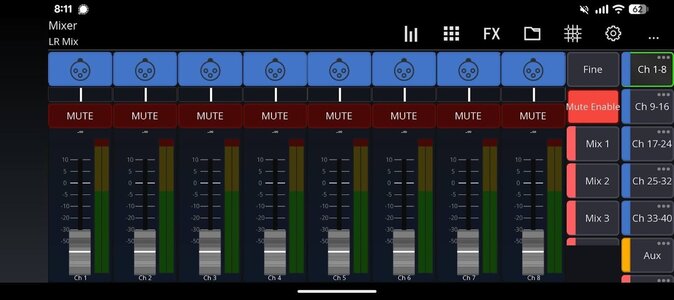
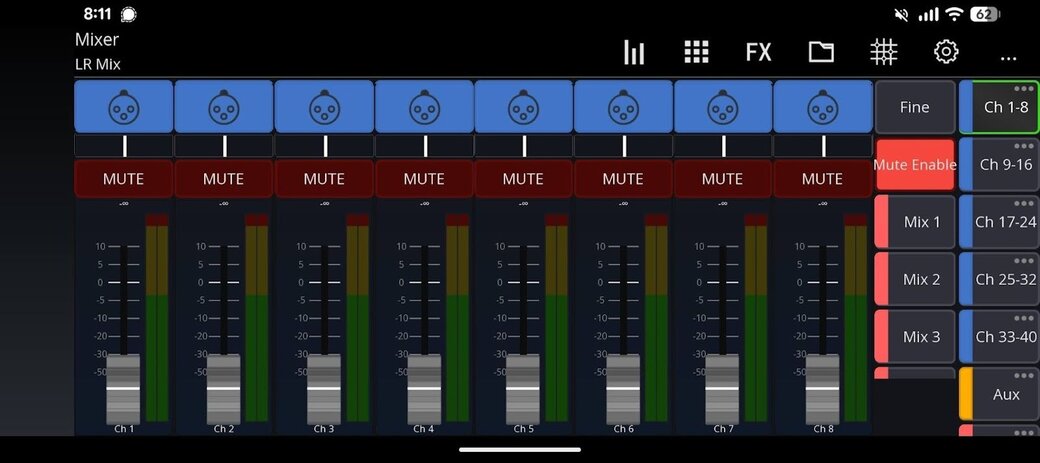
Upon connection, the app displays the main workspace, starting with the fader view. You will see a bank of eight Channel Faders across the screen for level adjustment.
Use the Layer Navigation tabs on the right side (often labeled CH1-8, MIX, AUX, etc.) to quickly switch between different groups of faders (like inputs or monitor mixes). To access the full processing controls—such as EQ, dynamics, and routing—for any specific channel, simply tap the channel's label above its fader.

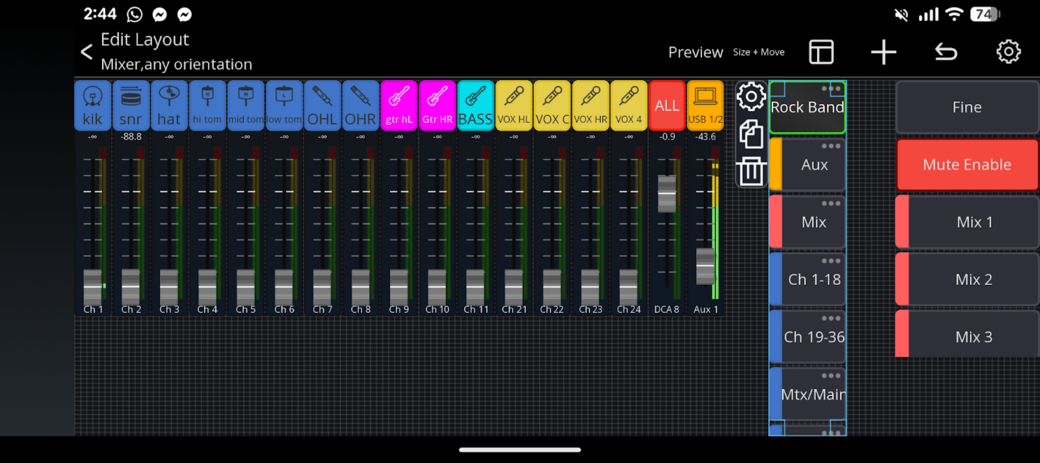
Recommended Tweaks
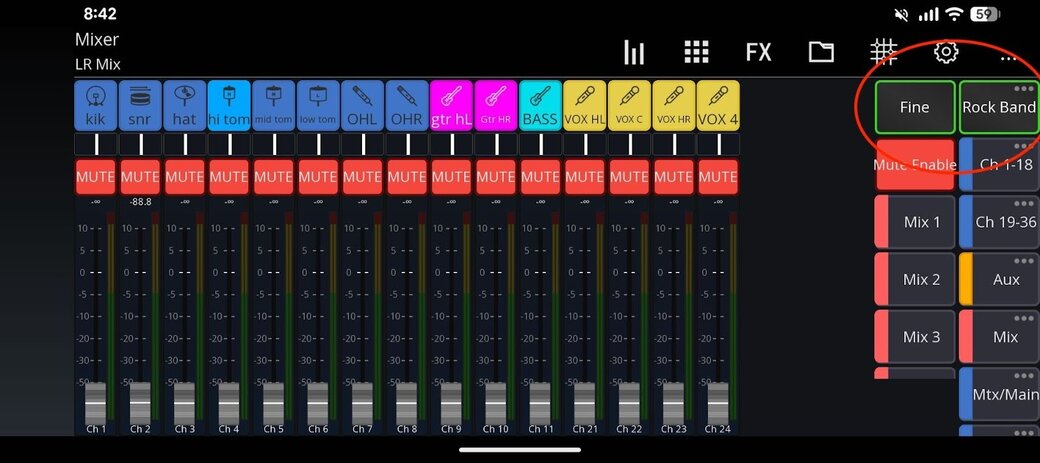
Enable “Fine” Adjustment: To make highly accurate, subtle adjustments to a fader level, locate the 'Fine' button (the small in the top right next to the layers). Tapping this toggles the faders into fine mode, which reduces the travel distance of the fader for a given decibel change, allowing you to move the level much more precisely. We recommend you leave this on.
Enable “Mute Enable” If you don’t have this button toggled, you can’t mute or unmute channels. We’d recommend you enable this to start.
Basic Usage
4. Adjusting Levels in the Mains
From the default view of Mixing station you can slide the faders for each channel to control how much of each channel the audience will hear.
Adjusting the overall master level of the main speakers
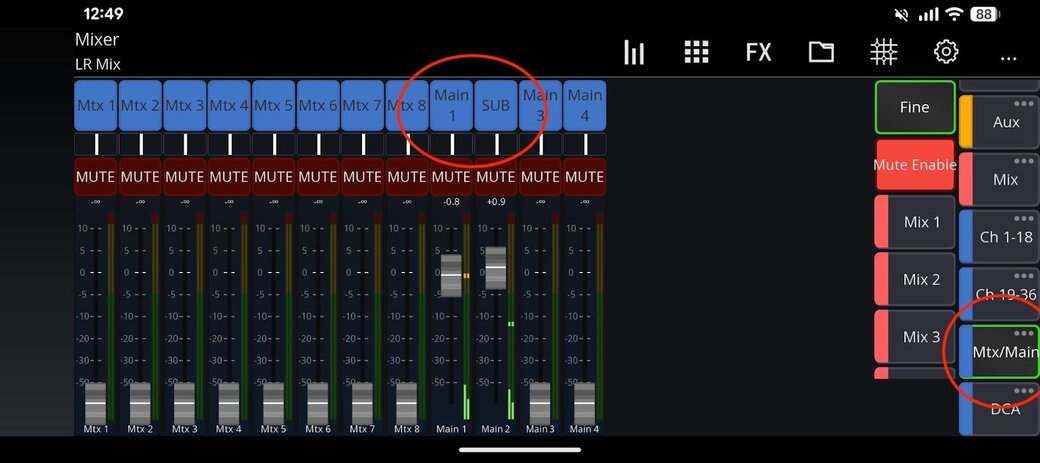
The Master Fader controls the final output volume sent to the main speakers (the Mains).
By default, the Master Fader is found within the navigation layer labeled Mtx/Main (or similar). Once that layer is selected, and depending on your routing (see 10. Accessing Console Functions (Routing)), locate the fade labeled Main 1. In our Example below the Main Fader runs the Left and Right Channels, and we have relabelled Main 2 as SUB for our subwoofer.
-
To increase the volume: Push the fader up.
-
To decrease the volume: Pull the fader down.

Safety Tip: Always make small, gradual adjustments to the Master Fader to avoid sudden, loud changes. Use the 'Fine' button (as mentioned in Section 3) if you need ultra-precise control.
5. Setting Monitor Levels
Setting monitor levels tells the console how much signal from each input channel should go to a specific monitor mix bus (different names for monitor, wedge or in-ear mix).
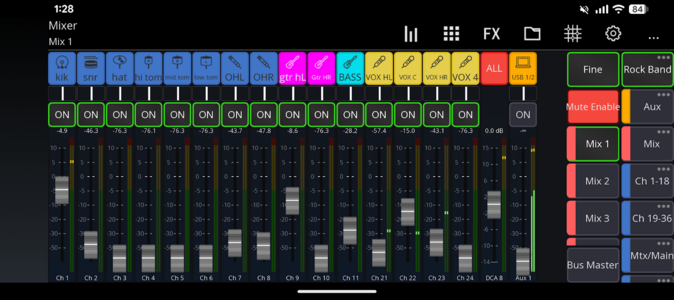
Method One - Sends on Fader Style
This method uses the Sends on Fader (SOF) function to dedicate your main faders to controlling the sends for a single mix bus.
-
Select the Mix Bus: Locate the Mix 1-8 layer tabs in your navigation bar on the right.
-
Activate SOF: Tap the specific Mix Tab corresponding to the monitor mix you want to adjust (e.g., Mix 1).
-
Adjust Levels: The app displays the channels from your currently active Custom Layer (what we’ve called "Rock Band"). The faders now control the level of those channels being sent to Mix 1. Further ensure your channels are highlighted “ON” in the mix.
-
Exit SOF: Tap the Mix 1 again to go back to mixing the front of house level..
Key Takeaway: By combining the channel filtering of your Custom Layers with the level control of Sends on Fader, you can see and adjust everything a specific monitor mix might require, while ignoring unnecessary channels.

Method Two - Adjusting Sends for a Particular Channel
This method is useful for quick, channel-specific adjustments to multiple monitor mixes (e.g., boosting the lead vocal into all monitors).
-
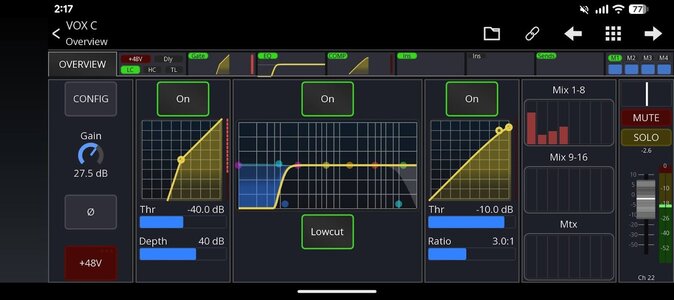
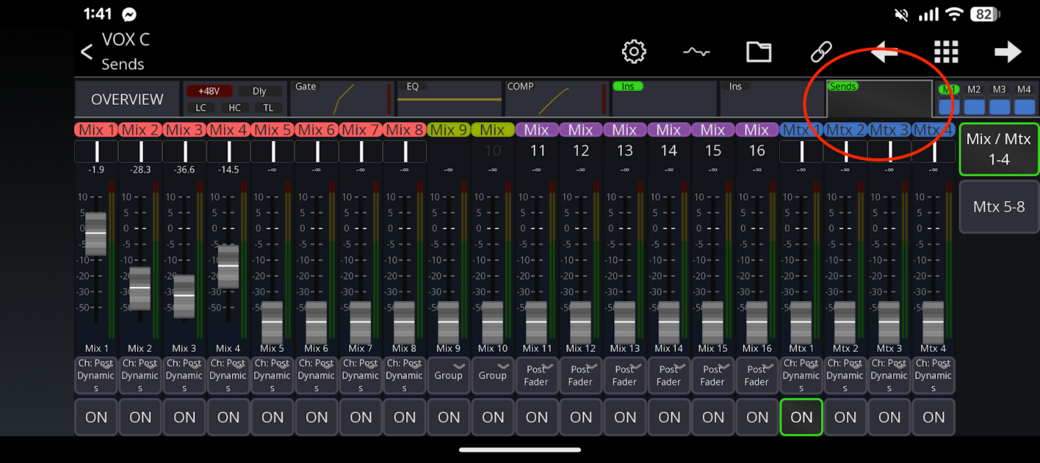
Open Channel Detail Screen: Tap the name or number label above the fader of the specific channel you want to adjust (e.g., “VOX C" channel).
-
Navigate to Sends: In the Channel Detail Screen that opens, find the SENDS tab at the top of the screen.
-
Adjust Levels: This screen displays a bank of faders or knobs representing all available Mix Buses (Mix 1, Mix 2, etc.). You can now adjust the level fader for each mix bus individually to control exactly how much of the VOX C channel is sent to that specific monitor mix.
-
Exit: Tap the Back or Close button to return to your main fader view.


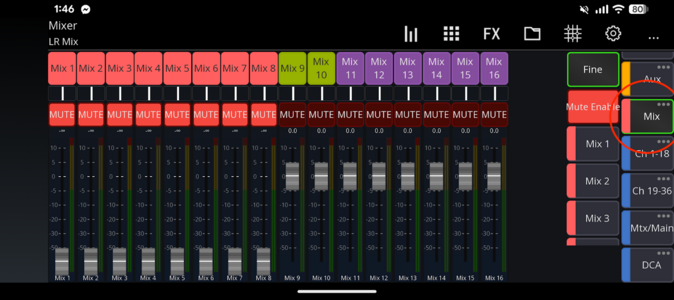
Adjusting Entire Mix Volume
To raise or lower a musician's entire monitor mix (e.g., Mix 1) while maintaining its internal balance:
-
Tap the MIX Layer Tab in the navigation bar.
-
Locate the corresponding Mix Bus Fader (e.g., the Mix 1 fader) and adjust its level.

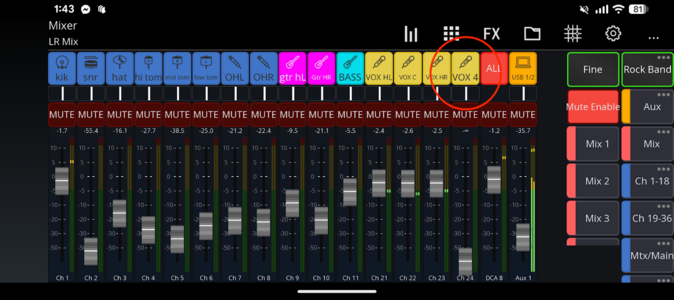
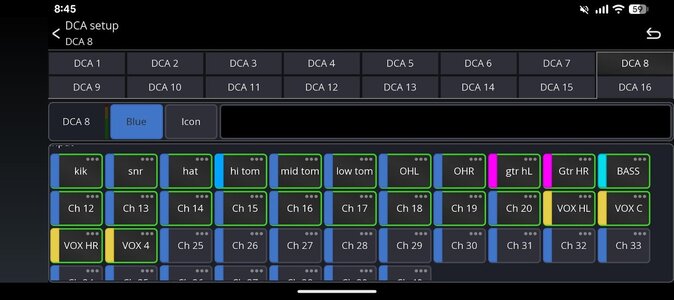
6. Labeling Channels with the Scribble Strip
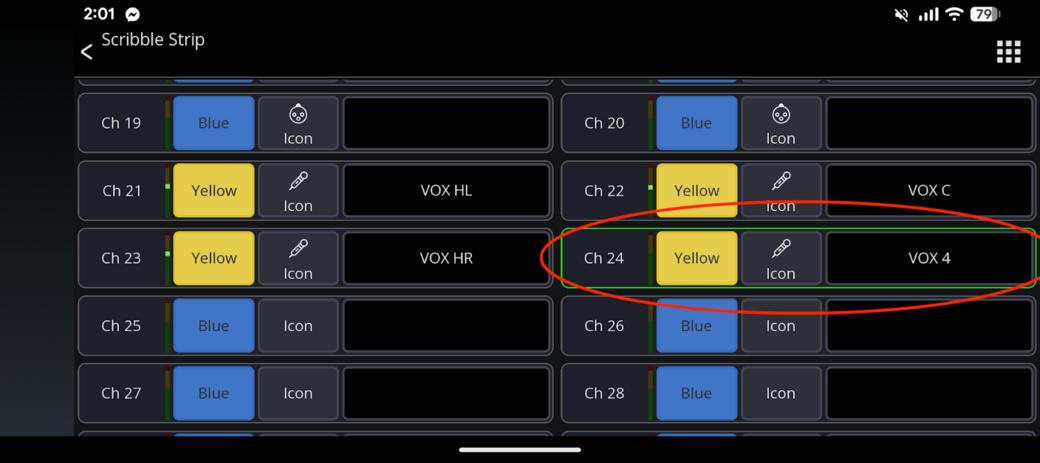
Labeling channels is essential for quickly identifying inputs. Mixing Station allows you to instantly customize the channel name, color, and icon shown on the digital label (the Scribble Strip).
-
Access Labeling: Tap and hold the Scribble Strip area—the digital name/number plate located directly above the channel fader.
-
Edit Dialogue: A small editing window will appear. Here you can:
-
Name: Type a clear label (e.g., "VOX 4, VOX C, etc").
-
Color: Select a color for the fader and label background.
-
Icon: Choose a relevant icon (e.g., a microphone in this case).
-
Confirm: Tap OK to save the new label. The change will be immediately visible on the channel strip and shared with the console.


7. Modifying EQ, Effects, and Parameters
To sculpt the sound of any individual channel (like applying equalization or compression), you need to access the Channel Detail Screen.
-
Access Channel Details: Tap the name or label on the directly above the channel fader (e.g., the "VOX C" channel).
-
Navigation Tabs: The Channel Detail Screen opens, displaying all processing controls. Located across top and side:
-
EQ (Equalizer): Adjusts the frequency balance (e.g., cutting muddy low-mids or boosting high clarity).
-
DYNAMICS: Controls compression, gating, and limiting to manage volume consistency and eliminate noise.
-
BUS SENDS: (As covered in Method Two of Section 5) Allows you to set the monitor levels for this specific channel.
-
FX: Sends the channel's signal to internal effects units (like Reverb or Delay).
-
Adjust Parameters: Tap the desired tab (like EQ) and use the on-screen graphical controls (knobs, faders, graphs) to make your adjustments.

Advanced Usage
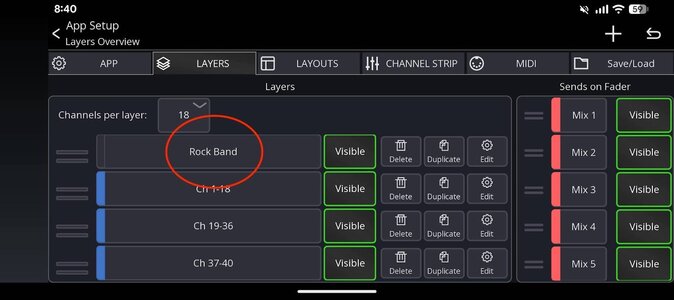
8. Customizing Layers
One of Mixing Station's greatest strengths is creating Custom Layers to organize channels exactly how you need them.
Accessing Layer Customization
-
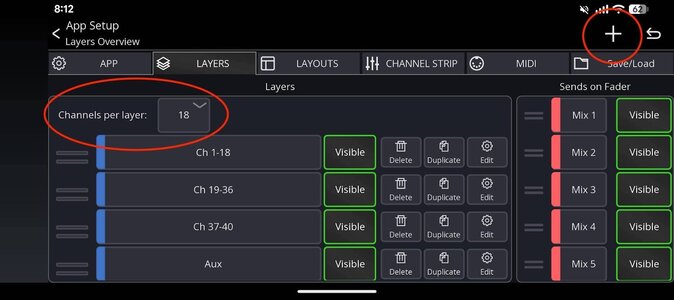
Open Settings: On the main mixing screen, tap the Gear Icon located in the top-right corner.
-
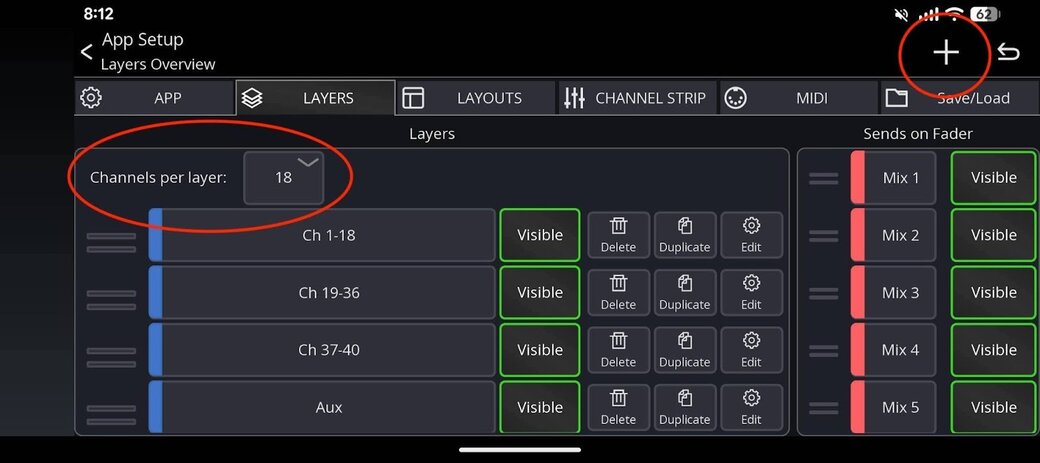
Enter Layer Editor: In the menu that appears, tap the Layer button (which you have circled) to open the Layer Editor.
-
The first thing we’d recommend you do is to increase the number of channels per layer, by changing the value circled below. After making that change it will ask you if you’d like to adjust existing layers to the new channel count. That’s usually a good idea.


Quick How-To: Creating and Assigning Layers
The Layer Editor is a simple drag-and-drop system.
-
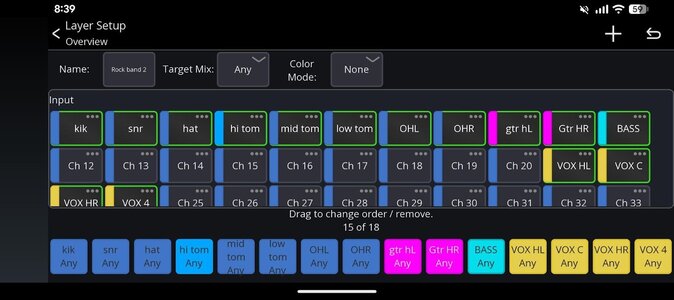
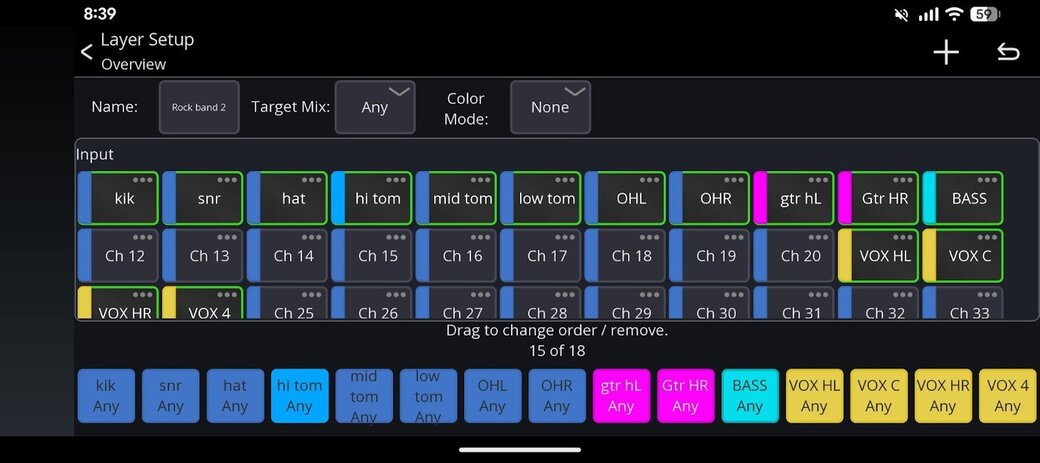
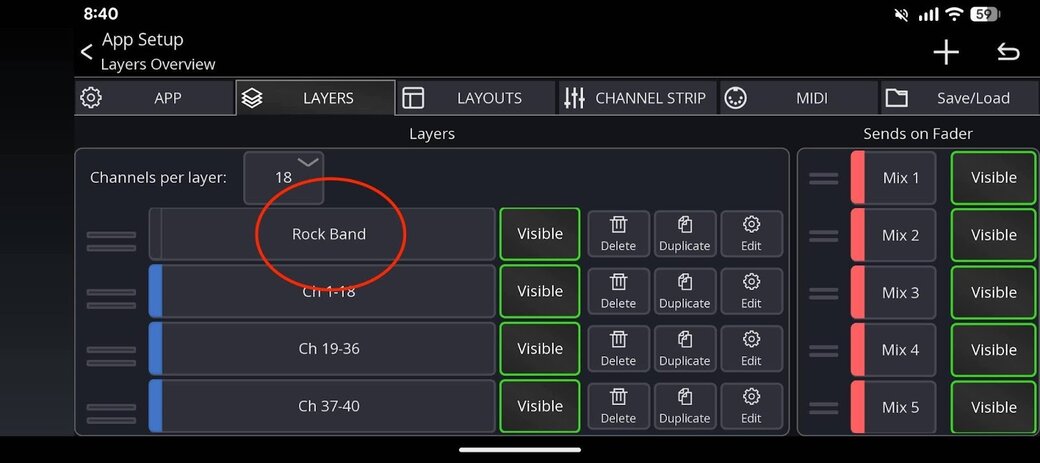
Add Layer: Tap the plus (+) button to create a new layer and give it a name (e.g., "Rock Band").
-
You will see all Available Channels. Highlight the desired channels (Inputs, Mixes, etc.) from this list onto your new custom layer.
-
Save: Tap the Done (or back arrow) button to save and activate your custom layer. It will immediately appear in your main navigation tabs.


Using Your Custom Layer
When you return to the main mixing page, your new layer, labeled "Rock Band" will be available in the navigation tabs, showing only the channels you assigned (in our case Drums, Guitars, Bass, and Vocals).

9. Group Control with DCAs
DCAs (Digitally Controlled Amplifiers) are faders that act as remote controls for groups of channels. They let you adjust the volume of multiple channels (like all the drums or all the vocals) simultaneously, without changing the internal balance you set on the individual channel faders.
Creating a Mixing Station DCA
-
Enter Layer Editor: Access the Layer Editor again via the Gear Icon and the Layer button (also accessible from Main Layers Page DCA)
-
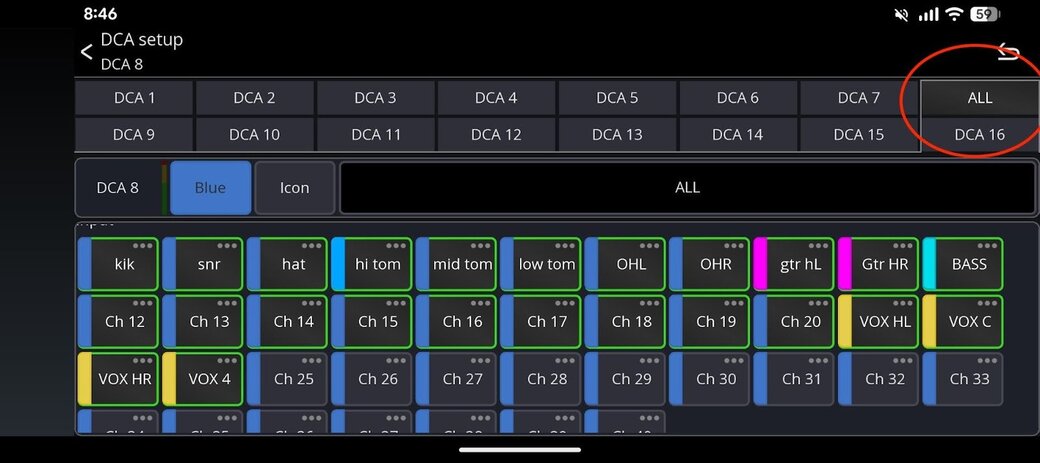
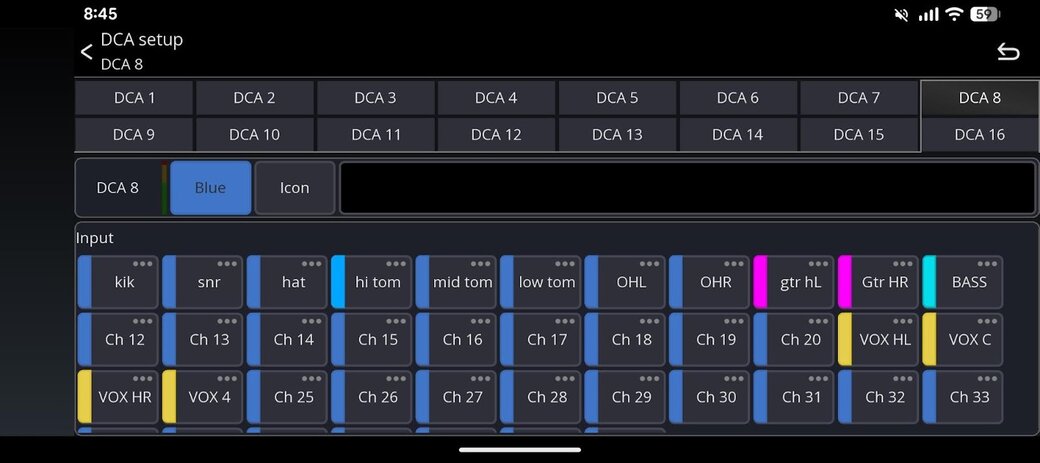
Add DCA: In the Layer Editor menu, tap the plus (+) button. This time, choose the option to Add DCA.
-
Name and Assign: Name your new DCA (e.g., "ALL"). The app will then prompt you to select the individual Input Channels you want this DCA to control (e.g., Kick, Snare Top, Tom 1, etc.).
-
Save to Layer: Once created, drag the new DCA from the Available Channels list onto your Custom Layer (or any other layer you prefer) and Name it.


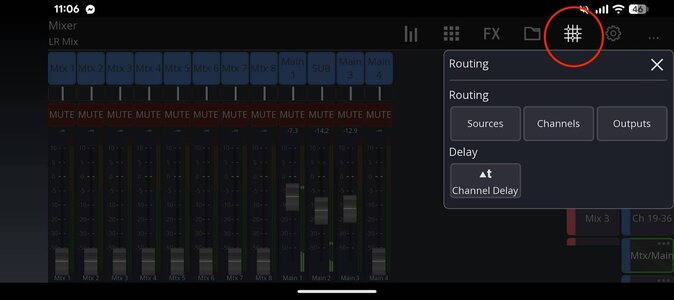
10. Accessing Console Functions (Routing)
Mixing Station places key console configuration functions right in the top menu bar for fast access.
Locate and tap the Routing Icon (the grid, hash, or matrix-like symbol) at the top of the main mixing screen.

What You Find Here
The Routing screen allows you to configure the digital patching of your console This is where you determine:
-
Which physical inputs are assigned to your console channels.
-
How your console's outputs (Mains, Aux Outs, etc.) are physically assigned to the outputs.
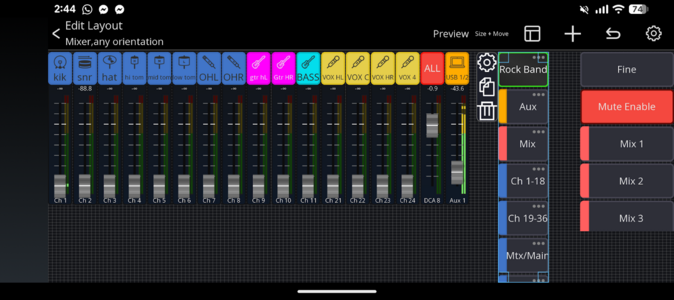
11. Custom Layouts (Advanced)
Custom layouts allow you to actually change the way the interface appears and is laid out. You can add extra buttons, change where the faders sit, remove elements you don’t need and essentially make it ready for you or other users depending on the usage.
Note: This feature typically requires the Pro License for the Mixing Station console module.
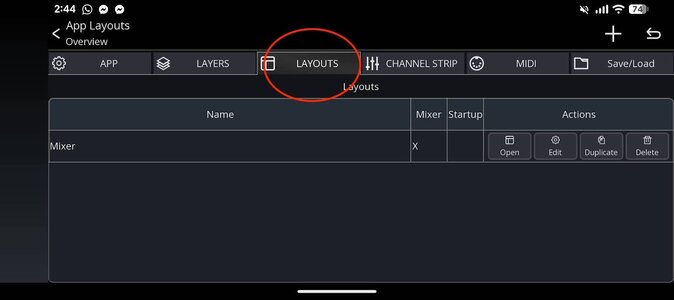
Accessing the Layout Editor
-
Open Settings: Tap the Gear Icon in the top-right corner of the main mixing screen.
-
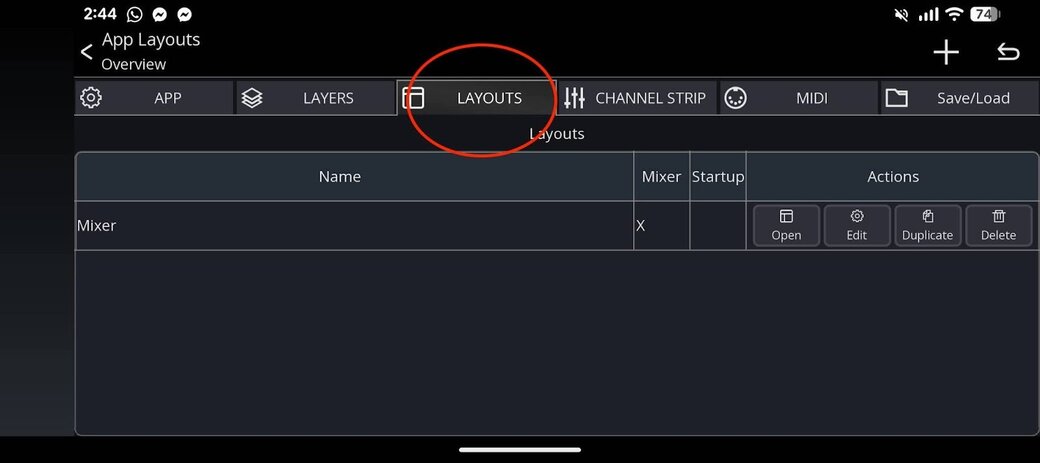
Enter Layout Editor: In the menu that appears, tap the Layout Editor button.
-
Customize: The interface switches to an editing mode. You can drag, drop, resize, and delete every visual element on the screen, as well as add new widgets (like custom buttons, meters, or new faders).u
-
Save: Tap the back arrow to save the layout and activate it.


